
Craig Rowe
Techlead / Developer
9th August 2009
Ubuntu gets inside Windows
Some time ago, after building my PC and getting rather hard drive happy, I set up an install of Ubuntu on a dual boot (for all that native linux work I do...). However I soon found that going back and forth between the two was putting me off making any active use of it. And so the quest began...
Ok, so not really a quest but I did want to get to my ubuntu/vista holy grail:
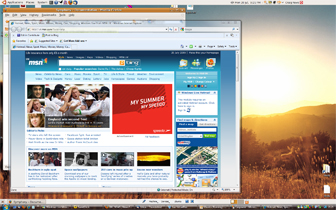
The above is a screenshot of my current set up. Running Vista natively I use Sun's Virtual Box to access and use the Ubuntu install that I had previously been separately booting into. This means I can avoid any migration of data from the separate disk into a VHD and I can still boot into Ubuntu natively if I need to. In seamless mode I can even play around and make screenshots like the above where IE sits above an Ubuntu Firefox
Step 1 (implied): Dual Boot Ubuntu and Vista
Install Ubuntu onto a separate drive and get it to dual boot (Download Ubuntu, create bootable disk, install to new drive, setup booting etc). Depending on how you set it up you may find Easy BCD a useful app (if you end up wanting to frig with the windows Boot Loader).
Step 2: Download and Install Virtual Box
Nip over to Virtual Box and bag yourself a copy - currently 'VirtualBox 3.0.4 for Windows host'.
Bearing in mind the joy of Vistas UAC you may need to run this as admin.
Step 3: Read the documentation - get scared
Page 134 of the version 3.0.4 user manual describes the use of a complete physical hard disk as the source for the guest operating system.
Apart from scaring the bejesus out of you with talk of corruption and loss of data it identifies that you need to create a VMDK file and assign it to a virtual machine.
Step 4: Creating a VMDK file
Section 9.10.1 provides us with the following code (to run in a dos command window - that is again being run as admin):
VBoxManage.exe internalcommands createrawvmdk -filename /path/to/file.vmdk -rawrisk /dev/sda
This will create a vmdk file named 'file.vmdk' from the disk '/dev/sda'. Ultimately the example code translates for us 'Vista hosting Ubuntu' folk to something like:
C:\Program Files\Sun\xVM VirtualBox>VBoxManage.exe internalcommands createrawvmdk -filename C:\Tools\ubuntu.vmdk -rawdisk \\.\PhysicalDrive2 -partitions 1,5 -register
fig. 1.1Note that two partitions are included in my VMDK creation script - unlike the example code. The user manual doesn't include partition specifiers. However if you need to do so you can identify the partition numbers using the following command:
C:\Program Files\Sun\xVM VirtualBox>VBoxManage.exe internalcommands listpartitions -rawdisk \\.\PhysicalDrive2
fig. 1.2This will result in a screen similar to below (you can see where I got 1,5 from for my createrawvmdk command):

PhysicalDrive2 in the createvmdk command is in reference to the fact that my machine was/is running 3 HDs (Windows (0), Data (1), Ubuntu (2)).
Step 5: How am I going to make it boot?
The easiest way to boot the system is to create a bootable CD and mount that as part of the virtual machine startup. To create this, first boot into your Ubuntu install.
Gnu.org then provides a succinct description on how to create a bootable grub CD:
- Create a place to store your source files for the bootable disk ([home folder]/iso/boot/)
- Copy the 'stage2_eltorito' file from '/usr/lib/grub/i386-pc/stage2_eltorito'
- Copy the menu.lst file from '/boot/grub/menu.lst'
-
Or just run:
                ~$ mkdir iso
                ~$ mkdir -p iso/boot/grub
                ~$ cp /usr/lib/grub/i386-pc/stage2_eltorito iso/boot/grub
fig. 2.0
At this point you may wish to edit the menu.lst file. My original menu.lst file included menu options for Ubuntu and Vista. As the boot would be occuring within the VM with knowledge only of the physical disk I was booting in to I had to adjust the menu items. Removing the vista related boot options and changing the ubuntu options to use (hd0,0) instead of (hd2,0).
An ISO can then be created using mkisofs as below (assumes [home folder]/iso/boot as the location of the copied stage2_eltorito and menu.lst):
~$ mkisofs -R -b boot/grub/stage2_eltorito -no-emul-boot -boot-load-size 4 -boot-info-table -o grub.iso isofig. 2.1
For more information on the mkisofs command check out the man page. In short:
- -b signifies an El Torito bootable media is being created from the path 'boot/grub/stage2_eltorito' (relative to the source path - the 'iso' at the end of the command).
- -o signifies the filename of the iso output (grub.iso).
- -no-emul-boot is included as this is not a floppy image
- -boot-load-size 4 is recommended for backwards compatibility as some OS's will have problems if it is not a multiple of four
Before returning to Ubuntu copy the ISO to somewhere accessible to windows (either direct to a shared HD or temporarily on to a USB etc).
Step 6: Start it up
Back in vista you should now be able to open up VirtualBox (running as admin to avoid permissions errors on disk access).
- Create a new virtual machine with whatever name you like as Linux Ubuntu
- Choose an allocation of Memory. I opted for 512MB of my total 4GB
- Choose 'use an existing hard disk' and select the VMDK file you created earlier
- Once created open the settings for the new virtual machine and choose 'CD/DVD-ROM'
- Choose to Mount an ISO image file and choose the ISO you created within ubuntu
- Ensure the boot order under 'System' has CD/DVD-ROM above Hard Disk
- Start the Virtual Machine
Step 7: Ok so I'm in.. but the resolution is tiny
The first thing I noticed when I entered the VM was that I had a very low resolution and was unable to resize the window larger. This may not be an issue for you. However if, like me, it was then you need to install VirtualBox Guest Additions.
Using the 'Devices -> Install Guest Additions' option on the VBox window attempts to mount the Guest Additions install as a CD within Ubuntu. However when I tried this it kept getting confused between the grub.iso and the disk I was trying to mount. Rather than faff around too much I found it easier to do the following:
- Copy the VBoxGuestAdditions.iso from C:\Program Files\Sun\xVM VirtualBox\ to somewhere accessible by Ubuntu (either USB or direct to the ubuntu drive from windows while VBox is closed and before booting normally in to ubuntu).
- Within Ubuntu use something like gISOMount or simply extract the contents of the ISO
- From the command line navivate to the extracted/mounted folder and run:
~$ sudo sh VBoxLinuxAdditions-x86.run
fig. 3.0 - Back into windows and start up your VM - you should find that you can now resize to your hearts content. Choosing 'Machine -> Seamless Mode' will allow you to run Linux and Vista windows side by side as in the first screenshot.
Sources / Related Links
- http://www.virtualbox.org/wiki/Downloads
- http://download.virtualbox.org/virtualbox/3.0.4/UserManual.pdf
- http://www.gnu.org/software/grub/manual/html_node/Making-a-GRUB-bootable-CD-ROM.html
- http://linuxcommand.org/man_pages/mkisofs8.html
All article content is licenced under a Creative Commons Attribution-Noncommercial Licence.


